I will spare you from a lengthy monolog on why a CI Pipeline that requires manually configured environments is fairly limited when it comes to scaling it out to other projects, other teams. I assume that you have felt the pain yourselves.
There are different aspects to this topic including integrating with a cloud provider (AWS, Azure, GCP), using kubernetes or managing the Jenkins controller itself in a new way (JCasC, Jenkins Operator, etc.). However, I want to focus on Jenkins Agents and show you how to move from manually configured VMs to all-purpose agents with Docker. And since a lot of tooling in the automotive embedded world is Windows-based, I will focus on Docker for Windows (for which it’s a lot harder to find decent tutorials!).
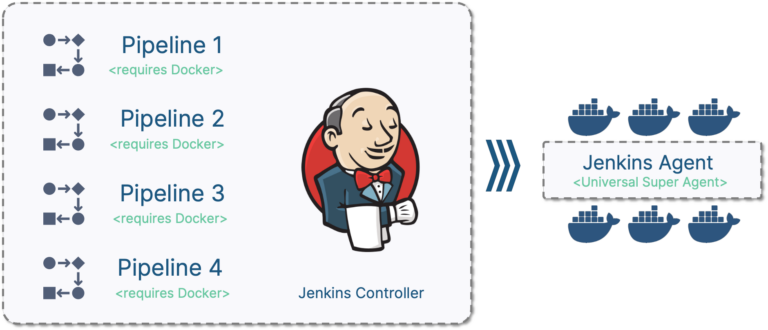
In essence, this article aims to help you achieve the ability to design Jenkins Pipelines that can run on any Jenkins Agent. In turn, this enables self-service CI, allowing your team to kick things off with zero delay:

What we have
I will start off with a Jenkins setup with one manually configured agent. This agent has all the software installed to support my workflow. For Model-based Development of embedded software, these are tools like
- MATLAB Simulink
- An auto-code generator like dSPACE TargetLink
- A host compiler
- Tools for model-guideline-checking, MISRA-rule-checking and static analysis like Simulink Checks or Polyspace
- A test tool like BTC EmbeddedPlatform
Our existing Jenkins Pipeline just checks out files from the git repo and runs the tests:
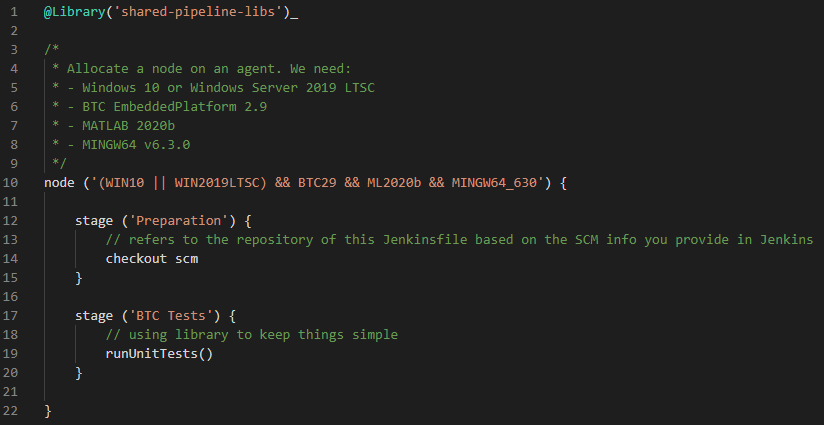
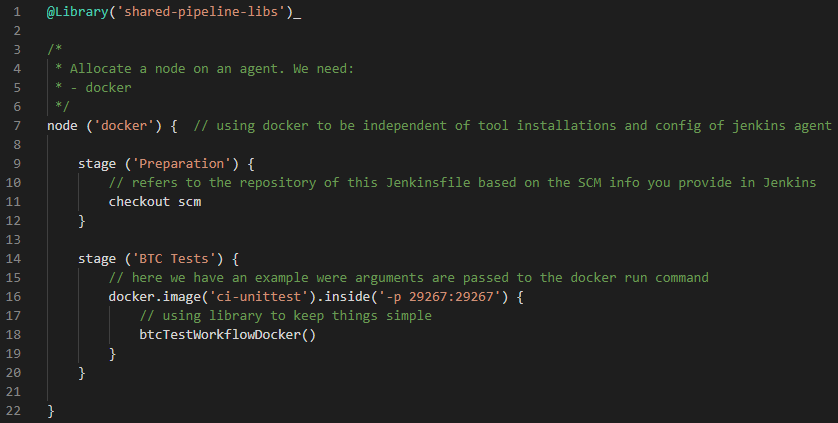
The node section of the scripted Pipeline specifies a label expression that reflects the different dependencies to applications and OS. This is required by the BTC Test stage that runs the unit tests. Let’s assume for a moment that we already have a docker container image that contains the required applications for each of these stages. We could restructure our Pipeline like this:
What we need
The above Pipeline would fail because we have not yet prepared our Jenkins setup to work with Docker and we have not created the mentioned image (ci-unittest). We now need to install the Docker Pipeline plugin on our Jenkins Controller and configure an Agent to host windows-based Docker containers.
Preparations
In the web interface of the Jenkins Controller: Manage Jenkins > Manage Plugins > Available: we search for docker pipeline and install it. If you already have a Docker registry to host your Docker images you can configure it in the main configuration section (Manage Jenkins > Configure System). For now, it’s not mandatory though because we will use the same machine to build the images and run the containers so we don’t necessarily need a registry.
I’m assuming that you generally know how to connect a machine to serve as a Jenkins agent. If you don’t: checkout my video on the topic: https://youtu.be/r2u1oYJVkPY
To keep things simple, we will use a permanent agent to serve as the Docker host. In the Jenkins web interface, go to Manage Jenkins > Manage Nodes and Clouds > New Node. Provide a name and select Permanent Agent. You can adapt this further if you wish but for our purposes, it’s sufficient to specify a label (e.g., docker), a remote root directory (all job workspaces will reside there) and a connection method.
A note on the remote root directory: when Jenkins runs certain parts of a Pipeline in docker, it mirrors the workspace into the container so that the files are available. This is done using the docker run -v flag (–volumes). In my personal experience this only works robustly if the docker daemon and the mirrored directories are on the same drive (i.e., the C-drive unless you want to reconfigure the docker daemon).
The agent can be a fresh Windows 10 machine. All you need is Docker (https://docs.docker.com/docker-for-windows/install) and the windows “Containers” feature. If you don’t have an easy way to get a machine with Windows 10, you can consider using your laptop (for testing purposes, not for production scenarios!).
Once we have connected our new agent to the Jenkins controller, we can run a small pipeline to see if it’s working:

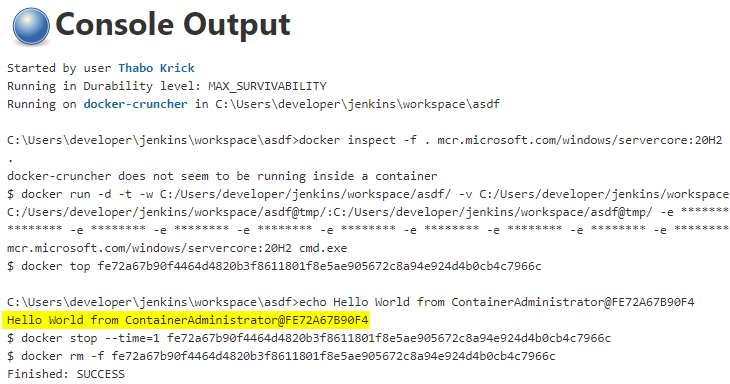
This is looking good, let’s build the images that we need for our existing Jenkins Pipeline.
Writing the Dockerfile
This part heavily depends on the applications that you want to package into a container image. On an abstract level it always the same though:
- Write a Dockerfile, that describes how the container image shall be prepared
- Call the docker build command to build the image (and optionally docker push to push it to a registry)
This blog article is no substitute for learning how a Dockerfile works but I would like to share some of my insights when it comes to bringing applications to docker that were not designed for it. Mostly, because there’s a couple of things that I wish I’d have known up-front. For more general details, please refer to the official docs (https://docs.docker.com/engine/reference/builder) and best practices (https://docs.docker.com/develop/develop-images/dockerfile_best-practices).
Base Image
FROM mcr.microsoft.com/windows/servercore:20H2
- You always start by extending a base image
- Microsoft mainly provides 3 base images: windows (Windows 10), servercore (Windows Server) and nanoserver (minimalist edition, very small)
- o While Nanoserver is very small, it is rarely feasible because you would end up having to add a whole bunch of dependencies to make things work as expected
- o The Windows image comes with the highest chances of having everything an application needs but is also fairly big
- o I’ve mostly seen Servercore where possible and Windows being used
- The part after the : is the version and refers to the major windows update versions such as 1809, 2004 and nowadays 20H2, 21H1, etc.
COPY and ADD
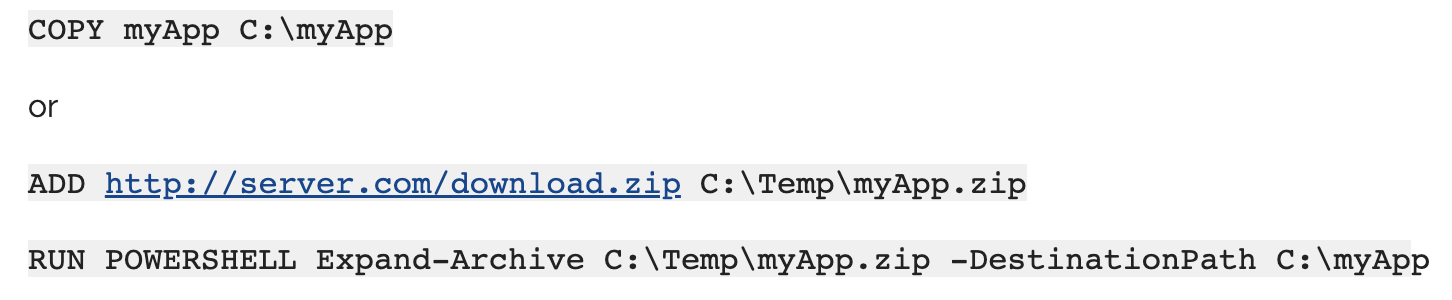
You can use COPY to copy files/folders from your build context (i.e., the directory of your Dockerfile or below) into the container or use add to download something directly and follow it up by unzipping for example:
COPY and ADD
SHELL and RUN
The RUN command let’s you run any kind of command inside the current container level using the default shell (cmd /S /C). You can run powershell commands by simply refering to POWERSHELL as the first argument of your RUN command (as seen above) or by specifying it using the SHELL command:
SHELL ["POWERSHELL", "-command"]
Installing an application can be as simple as copying the required files to a location (works for the MINGW64 compiler for example). If that’s not possible you can use the applications silent installation mechanism which uses a text file (recorded from a GUI-based installation or created from a template) as input for the installer. If you are having trouble with silent installation processes instantly exiting instead of waiting for completion, I recommend to try something like this (powershell script):
$p = Start-Process 'setup.exe' -ArgumentList '/s' -Wait -PassThru
$p.WaitForExit()
ENTRYPOINT
The ENTRYPOINT line tells the container runtime what to do when the container starts up. This should start an executable that doesn’t exit immediately, otherwise the container will exit as well.
Remove obsolete installation files
Keeping a container image as small as possible is important, therefore the container image should only contain essential files. Anything that you COPY / ADD to the container and only need it temporarily for installation should be removed as part of the Dockerfile. This way, the resulting image will not contain these obsolete files. For example, you can store all of your installation files and scripts in C:\Temp and remove the complete folder when it’s no longer needed:
RUN POWERSHELL Remove-Item -Path C:/Temp -Force -Recurse
ENV and Windows Registry
Required environment variables can be added with the ENV command, e.g.:
ENV MW_MINGW64_LOC C:/mingw64
In case you need to add something to the registry, e.g., to configure a license server, you can use the ADD or IMPORT commands of reg.exe. You can then either add the registry key directly or export a *.reg file from somewhere, COPY it to the container and add it:
RUN REG ADD "HKEY_CURRENT_USER\SOFTWARE\FLEXlm License Manager" /v MY_APP_LICENSESERVER /t REG_SZ /d 27000@192.168.0.1
or
RUN REG IMPORT C:\Temp\myRegistryEntry.reg
Debugging / Extended analysis
In case something doesn’t work as expected or you feel like there is no other way than to manually install something, after building the image you can use
docker run -it --entrypoint cmd my-image
to bring up the container, perform some changes manually and then call exit to stop the container. Afterwards, you can use the container ID (see docker ps -a) to commit the changes that you made into a new image:
docker commit deddd08923 my-modified-image
Please note that I do not recommend to do this outside of very special scenarios. Normally, all that is needed to produce a docker image should be part of the Dockerfile and its context.
Docker build
In essence, your Dockerfile should look somewhat like this with the main content being COPY or ADD to bring files into the container and RUN to perform installations and prepare everything:
FROM mcr.microsoft.com/windows/servercore:20H2
# add required applications & dependencies using ADD, COPY & RUN
# in my case Matlab, MINGW, BTC, …
ENTRYPOINT myApp.exe
Now we can build it using the docker command line. Let’s cmd or powershell on the windows machine that we recently connected as a new Jenkins agent and navigate (cd) into the directory of the Dockerfile. Now we can call:
docker build . -t ci-unittest
No need to push the image into a registry, since they will be hosted on the same machine only (otherwise you would call docker image tag and docker push after the build).
All set, the image is ready to be used by our restructured Pipeline.
What we gained
In our previous setup we needed to request an agent that met the needs of our Pipeline. This takes time and resources (as in: people had to spent time to deal with such a request). It also leads to long iterations if the environment is not setup 100% correctly, which can easily happen when we consider the complexity of the tool installations. By using Docker instead, we rely on an immutable image. We only have to get it right once, afterwards it’s guaranteed to work. Updates and changes are automatically documented due to the configuration as code approach (i.e., the Dockerfile).
By removing the dependency to specific agents, we have decoupled the individual Jenkins Pipeline from the environment that is required to run it. Now, all we need to do to get CI support for a project or component is to add a Jenkinsfile to the repository and point Jenkins to the repository URL:
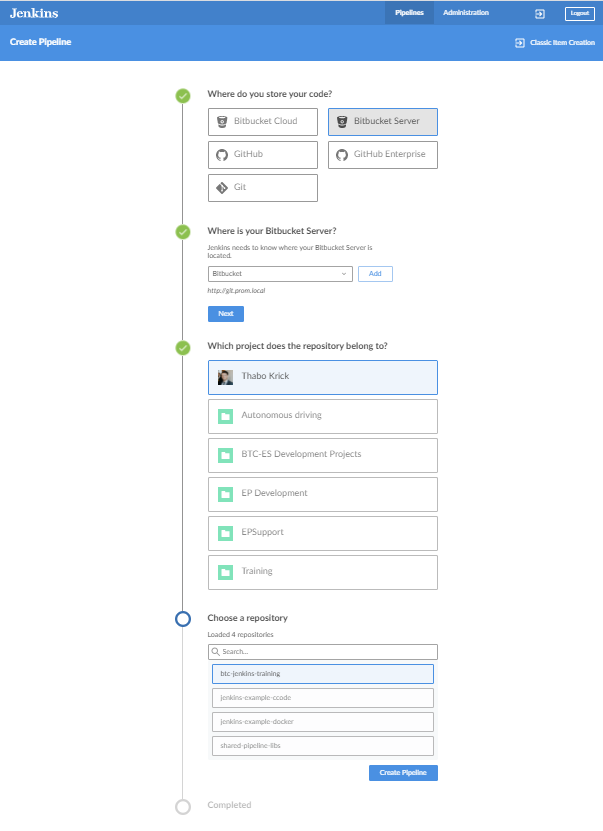
Self-Service CI
This creates a multi-branch pipeline for the selected git repository based the Jenkinsfile in your repo:

Conclusion: All smiles and sunshine?
Although we can already benefit from the achievements in cloud technologies, containers and distributed computing, there are still a couple of bumps in the road as of today (May 2021). Many tools are Windows-based and don’t ship with a system-independent API (such as REST). In our current approach, we throw a bunch of big applications into a single container. This provides an important level of abstraction but does not quite meet the idea of a services-based architecture that is meant to be used in the cloud. For a multi-container setup, communicating with applications across the borders of a container is vital for reliability and performance while keeping the cost low.
Furthermore, many consider windows-based containers more of a bridge-technology and only plan to use it, while waiting for all of their tools to run on a Linux environment. This is reflected in the much lower number of tutorials and docs for windows-based containers. From the technology standpoint, the Process Isolation approach provides similarly high performance and low resource overhead compared to Linux containers but we still face limitations from time to time that make the life of a DevOps Engineer much harder on Windows.
However, I personally believe that this is a road worth taking despite the bumps we’ll have to face. There is definitely a learning curve to a cloud-based setup (infrastructure management, cost planning and predictions, monitoring, etc.) independent of the details of each container but it’s an inevitable effort and an invest that pays off.
The shift from the current culture of „request > carefully consider > approve > provision“ to „self-service + monitored“ is an important part of success and is essential for removing friction and effectively reducing costs. While it is enabled by the technology (cloud, containers) it needs to be supported on the highest management level to be effective. One side effect is, that the daily routine of IT teams will change drastically which will inevitably lead to a certain level of resistance but I sincerely believe that it’s a win, also for IT teams. Honestly – who wants to spend their time manually configuring the 100th virtual machine for a team, knowing that they surely won’t get notified when it is no longer needed?
All in all, the benefits of a cloud- and container-based infrastructure and a self-service culture are extraordinary and the competitive advantage has already been proven in other industries. When looking at the complex, heterogeneous tool landscapes of automotive embedded software development for example, some doubt that these “overly hyped web development technologies” can apply to their domain. I say: don’t be afraid to dip a foot into the water, it’s already warmer than you’d have thought!